|
Latest News News Archives Interviews Mapping Contest |
||
| Maps | ||
| Download | ||
| Map Paks | ||
| Map Resources | ||
| Skies | ||
| Textures | ||
| Sounds | ||
| Prefabs | ||
| Tutorials | ||
| Editors | ||
| Links | ||
| .txt Gen | ||
| MapRid | ||
| Submit Map | ||
| Requirements | ||
| Testing How-To | ||
| Upload Map | ||
| FAQ | ||
| Forum | ||
| Top Maps (CLQ) | ||
| Death Match | ||
| Team Play | ||
| Search | ||
| Mailing List | ||
| AQMD Staff | ||
| Suggestions | ||
|
Sky Tutorial (Part 1 of 5) by [PnC]Muzma |
|
Want to make environment maps for Quake2 that don’t look cubic? Want to do it without spending ages touching up the corners of the individual sky pics? This tutorial is about how to do exactly that with Bryce 3d.
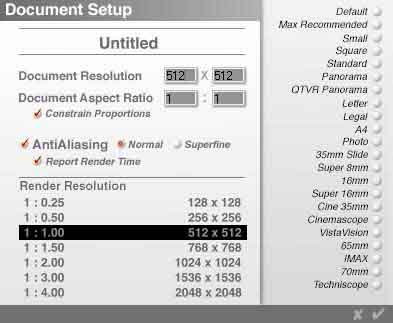
If you don’t know anything about Q2 skies/environment maps you should read Fishman’s tutorial on the subject to get familiarised with the basics. In particular the different images and the file name system for different angles, the different file formats for different renderers (software and hardware) and how to set the sky into your map (I’m not a mapper, I can’t tell you how to do that). The technique described in this tutorial was done using Bryce 3d and Photoshop 4; Bryce 3d for building the scene and Photoshop 4 to convert it into the format used by Quake2. Photoshop 4 isn’t essential for this, any graphics program will do so long as it can resize images and convert them to different formats and colour modes (the shareware version of Paintshop pro for example). This technique should also work with Bryce 2 no problem, but some of the functions I talk about might be in different places. I’m also assuming that people reading this are reasonably familiar with Bryce 2 or 3d; how it works, rendering etc. If you want some more detail on Bryce 2 scene building there’s a list of sites at the bottom that will get you started (and much more). Ok, the first and most important thing to do is create a Bryce 2/3d document for the env map and set up the document, the camera and the sky for (pretend) spherical rendering. Go into the File menu and go into Document setup. Down the right hand side of the box that pops up there is a list of default aspect ratios; pick Square (this makes the aspect ratio 1:1 ie the top/bottom and side resolutions will be the same) Next put in a resolution. Anything will do so long as the aspect ratio stays square. Also, remember that the final pics will have a resolution of 256x256, Photoshop and the like reduce images best when proportions are nice and relative, so multiples of 256 will get the best results. I chose 512x512 because I run windows in 800x600 and it fits nicely on the screen. This is what it should look like (in case I’m making no sense)
Next, the camera.
Got something to add or bitch about reagarding this page? Drop me an e-mail at [email protected]. |
| Newest Resources | ||
| New sky by GreyDeath | ||